Foundations of Music Literacy: Intervallic Reading (Part 2)

The Piano Safari Reading Approach
When I look back on my collegiate piano pedagogy classes, I realize how fortunate I was that my professors required an in-depth study of both current and historical piano methods. I spent many hours looking through methods, considering their strengths and weaknesses, noting what made them unique, and thinking through what elements I would use to design my own method. When I was in graduate school at the University of Oklahoma, I met my co-author Julie Knerr Hague, and we began the process of developing what would become Piano Safari.
After surveying piano methods, teaching for many years, and researching the history and philosophy of different reading approaches, we decided to use the intervallic reading approach in Piano Safari. The intervallic approach is optimal because it develops the ability to read by melodic contour rather than note by note, and lends itself more naturally to other factors that create fluent readers. In case you missed it, this was covered in Part 1 of this article.
Piano Safari Level 1
Following is a survey of how the intervallic reading approach unfolds in Piano Safari Level 1. This reading approach is applied in both Sight Reading & Rhythm Cards 1 and Repertoire Book 1.
Unit 1 & Sight Reading Cards Level A
Before students begin to read on the staff, we include two units of pre-staff reading to prepare them with basic skills. Pre-staff reading presents a more limited range of concepts so that students are able to focus on identifying right hand and left hand, learning finger numbers, reading rhythmic notation, and following the melodic contour. This is plenty to focus on for a student who is just beginning piano study.
Students begin by reading simple melodies, hands separately, using fingers 2, 3 and 4 on the black keys. It is very important that they play with non-legato articulation, as we do not want their fingers “spread out” over the black keys in a stretched position. Instead, students should keep their hand in a natural shape and align behind each key, playing from the forearm. For more information about non-legato technique, I suggest reading the Field Notes article Foundations of Piano Technique.

Unit 2 & Sight Reading Cards Level B
In this unit, students continue reading pre-staff notation, but move to the white keys. Melodies are slightly longer and additional finger numbers are used. In Repertoire Book 1, many of the pieces also include shifting octaves, as shown in the example below. In terms of technical development, it is still important to for students to play with non-legato articulation.
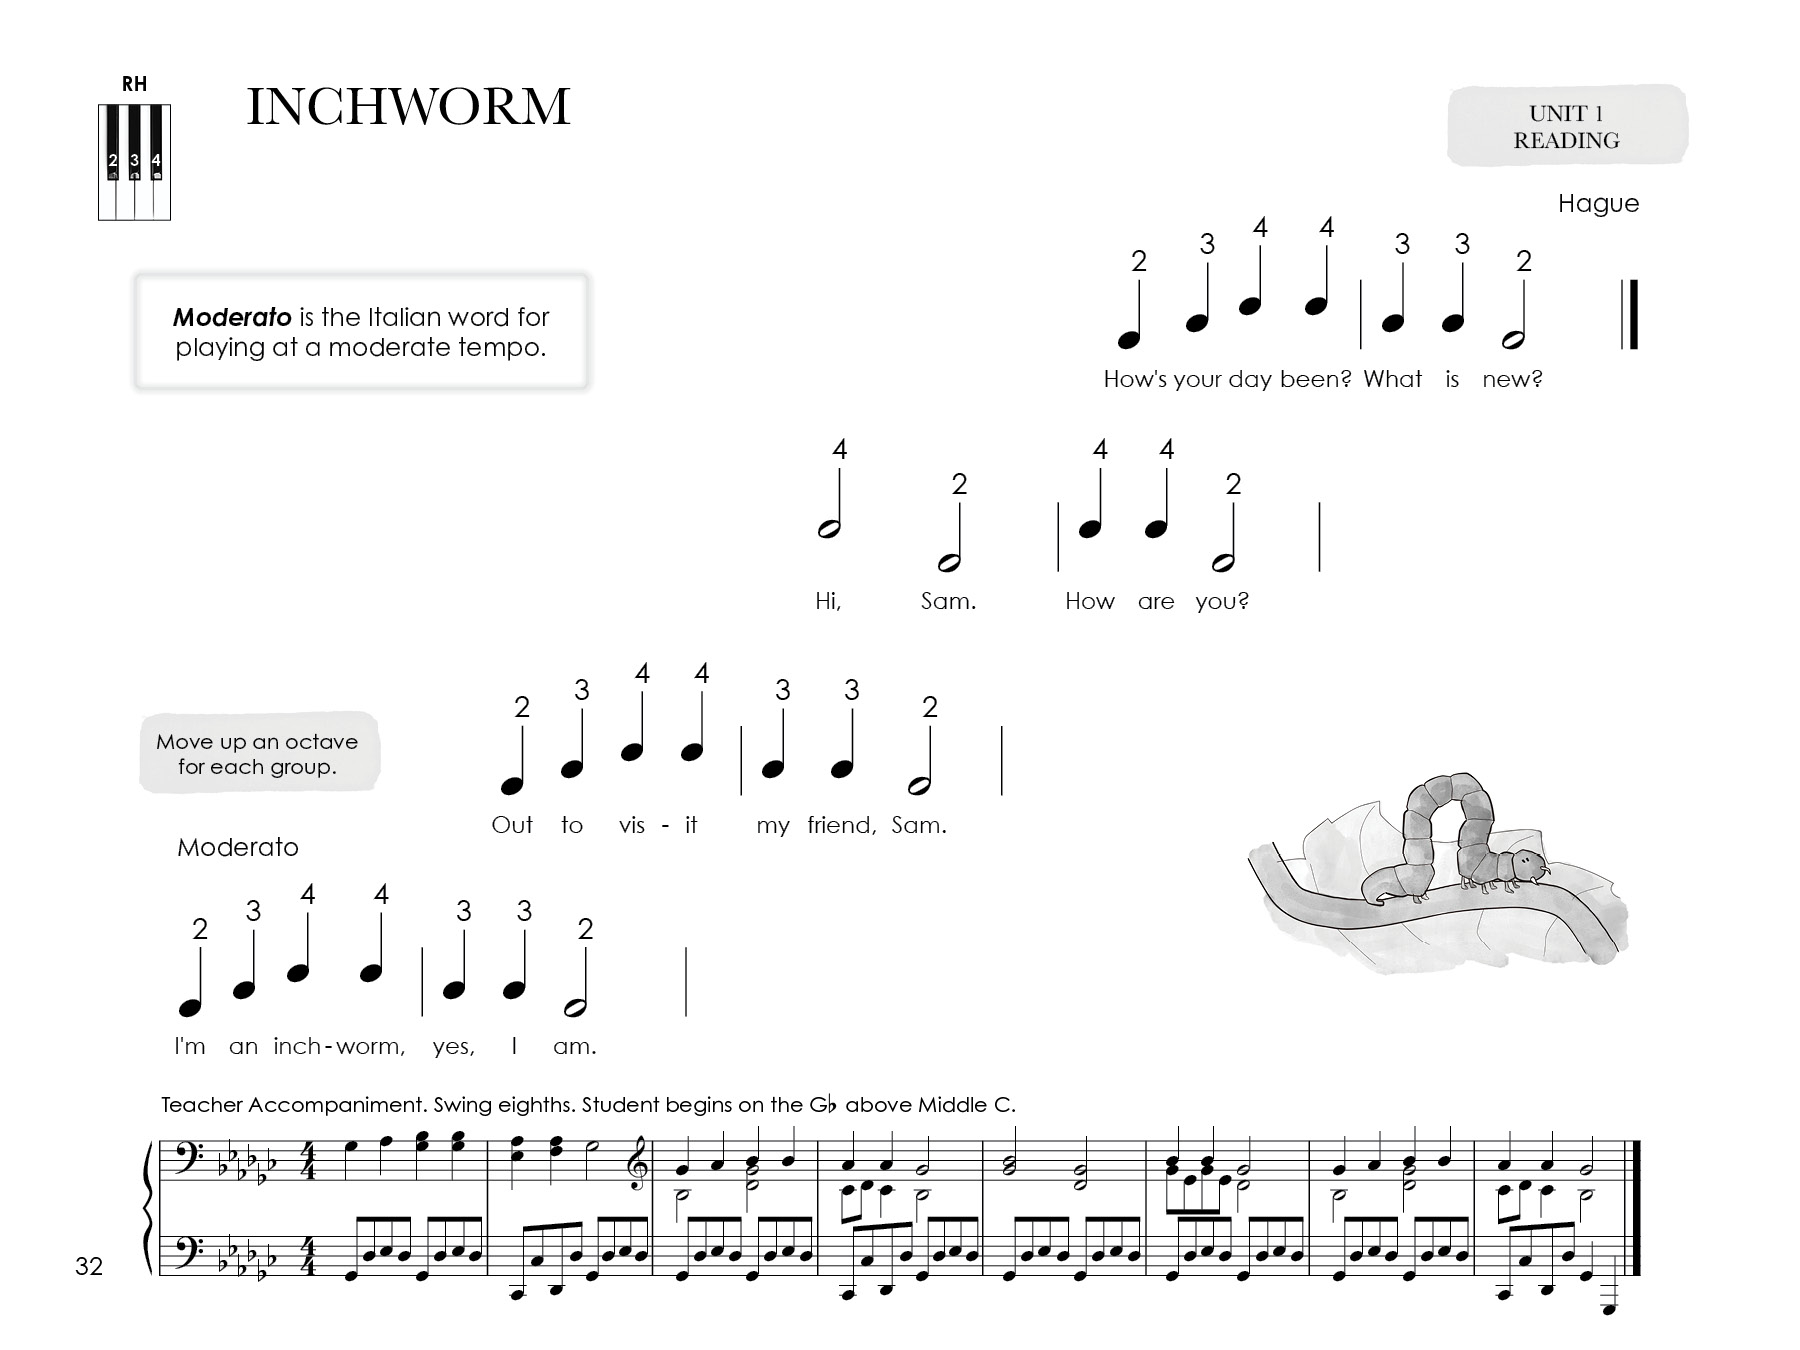
Unit 3 & Sight Reading Cards Level C
When students arrive at Unit 3, it is an important moment because they apply the skills they learned from pre-staff reading to the staff. Before reading a piece in this unit, students complete theory pages (included in both Repertoire Book 1 and Theory Book 1) to learn about line and space notes and landmark notes Treble G and Bass C. They are also introduced to the interval of a 2nd, and learn how 2nds move from a line to space or space to line. More extensive suggestions for how to introduce and drill these new concepts may be found in the Repertoire Book 1 Teacher Guide.
I want to add a quick note here about why we chose Treble G and Bass C as the landmark notes. First, we felt it was vitally important to have both a line note landmark and a space note landmark. In addition to making them easier to distinguish, this becomes particularly important in Unit 4 when students are playing all 3rds. They can plainly see how the notes move from line to line or space to space. Secondly, Bass C begins on the second space of the bass clef, and Treble G begins on the second line of the treble clef. This is an important fact for students to memorize so they can always identify where the landmark notes are located on the staff.
Unit 3 contains melodies with only 2nds and repeated notes. Every piece and sight reading card begins on one of the landmark notes, but students use different starting finger numbers. This means that they will not become “locked” in a position or develop the incorrect idea that a certain finger always corresponds with a certain note (e.g. students who learn to read in a method with a Middle C reading approach may think that the right hand thumb is always on C).
To read a melody with all 2nds intervallically, students simply follow the melodic contour. In my teaching of young beginners, I always emphasize that “notes move up, notes move down, and notes stay the same.” Before playing, students identify the starting clef and landmark note for each melody and write it on their piece or card. For consistency, I have them use "RH red" and "LH light blue." It is also an extremely beneficial step for them to find all the repeated notes (“sames”) and draw a line connecting the note heads, using a different color. The illustration at the top of this article shows a student engaging in this analysis step. It may be done at the piano or away from the piano, but it is of vital importance and must not be skipped.
Once the card is marked as in the example below, students name the opening landmark note and speak the melodic direction aloud before playing it on the piano (e.g. G, up, down, same). I am also sure to have them tap and count the rhythm on the fallboard before combining the notes and rhythm together.
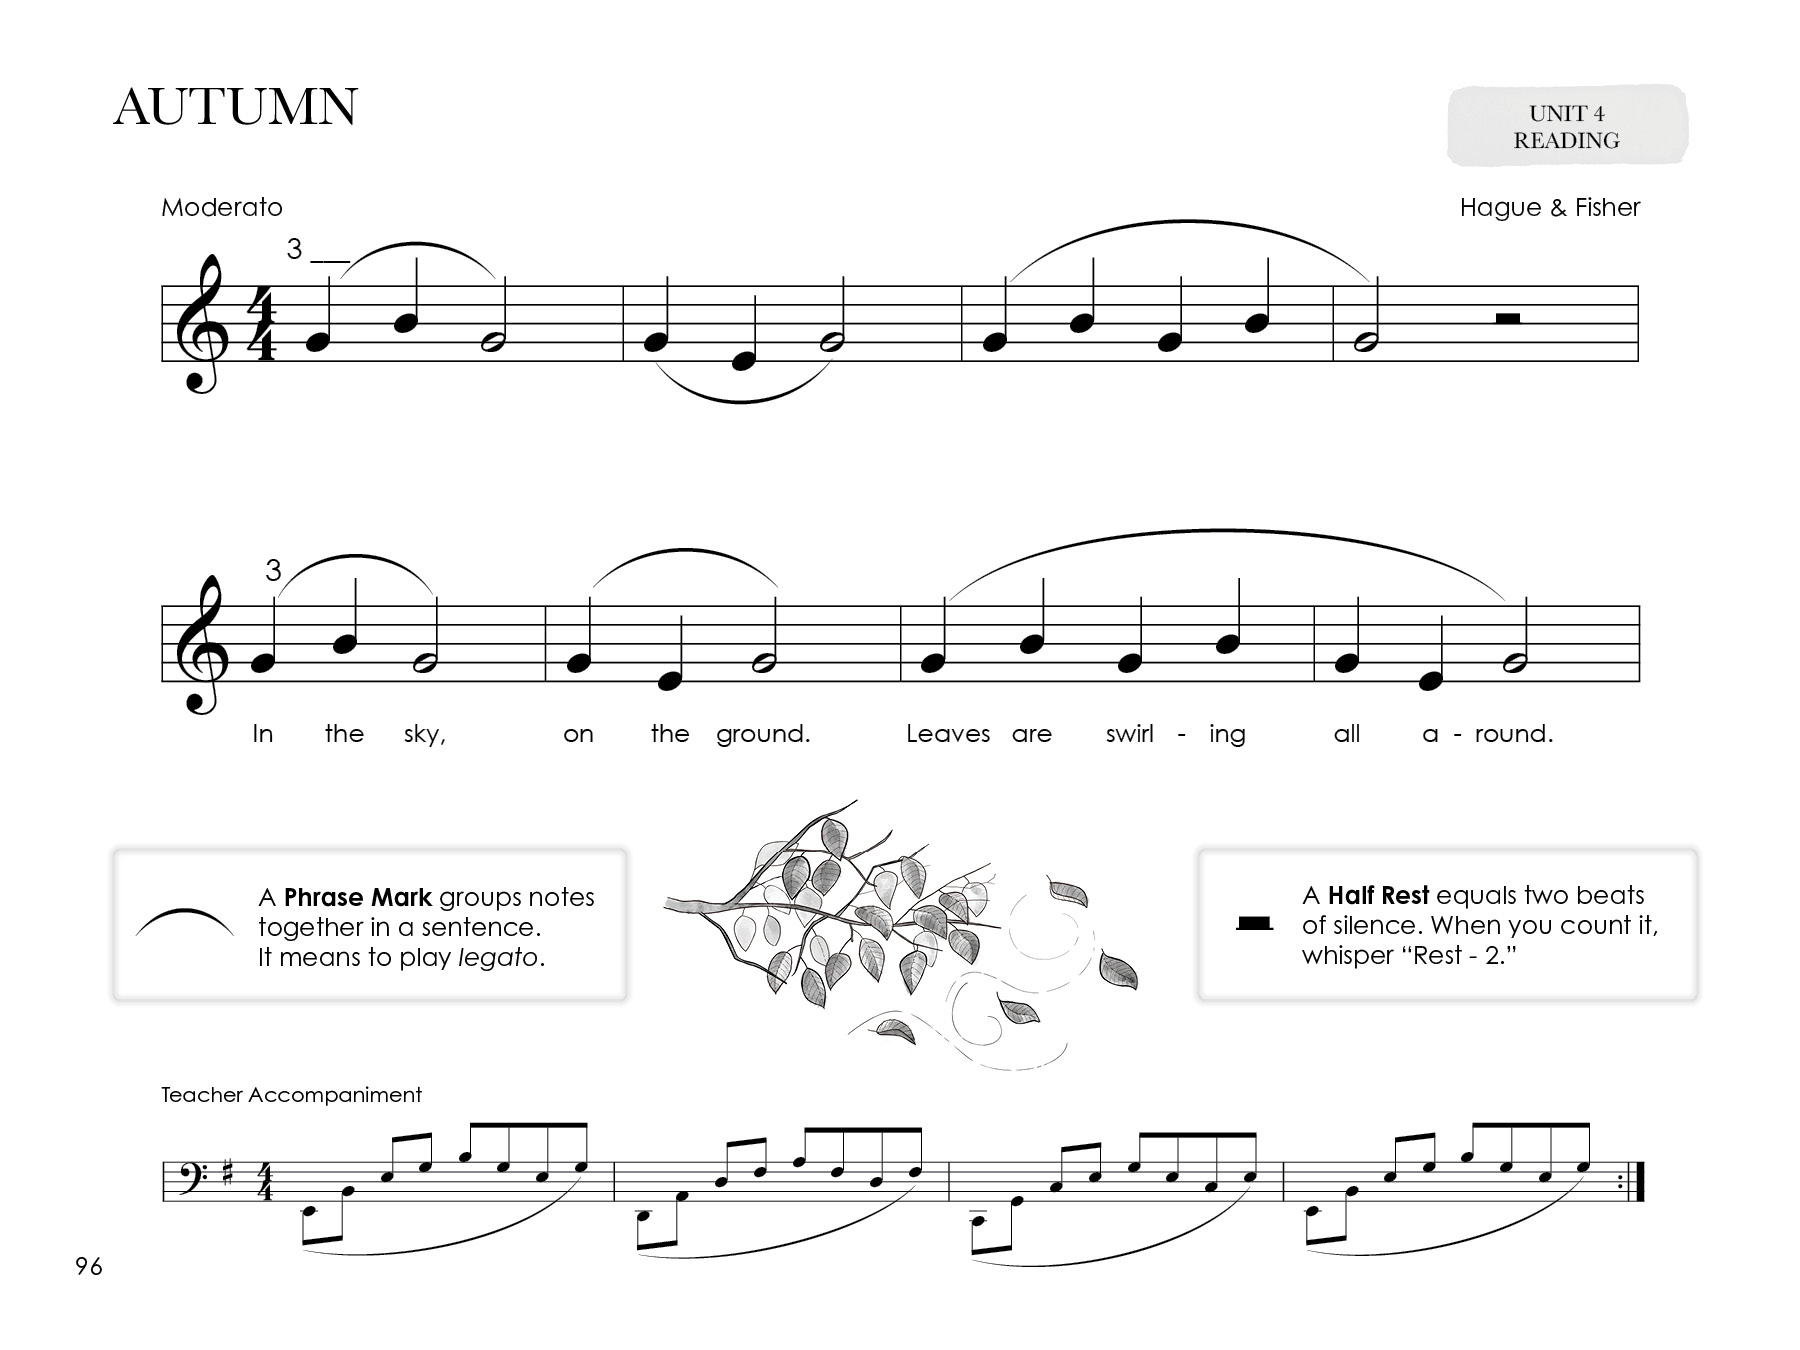
Unit 4 & Sight Reading Cards Level D
This unit contains melodies with only 3rds and repeated notes. Interestingly, I have found that many students find these pieces and sight reading cards much easier to read than those in the previous unit. I believe this is due to the fact that the notes are spaced further apart on the staff, so the melodic contour is even more apparent. However, the technical challenge of playing 3rds can take some time to master. Be sure students have played rote pieces with 3rds. It is also helpful to have them practice moving back and forth between fingers 1, 3 and 5 and also fingers 2 and 4 before playing an entire piece that uses 3rds.
Unit 5 & Sight Reading Cards Level E
In Units 3 and 4, students spent substantial time with 2nds and 3rds in isolation. This provided them with ample practice in recognizing each interval, (visual) playing it (kinesthetic) and hearing it (auditory). When students arrive at Unit 5, it is time to combine 2nds and 3rds together.
Although reading by melodic contour is still of primary importance, now students also need to distinguish between the 2nds and 3rds. In the analysis step before playing, I have them point out and mark all of the 3rds before they speak through the melodic direction.
General Suggestions
Scaling Difficulty
If you have taught Piano Safari Level 1, you will have noticed that all of the reading pieces and sight reading cards are to be played hands separately. This is so students can focus on reading in one clef at a time, and develop their skill at reading a single melodic line rather than contending with more complicated textures between the hands. With this said, if a student is technically adept and needs further challenge, we suggest having them play the reading pieces hands together in parallel motion. For students who struggle with technique or reading, however, please feel no pressure to increase the difficulty in this way. Students will still be able to build their technique and coordination in the rote pieces that are included in Repertoire Book 1.
Preparation for the Future
In Piano Safari Level 1, the focus is on reading intervallically from the landmark notes, Treble G and Bass C. When students enter Piano Safari Level 2, they begin to drill note names on the Grand Staff so that they are able to read pieces that begin off landmark notes. This process of drilling note names can begin sooner than Level 2, however. I like to ask students at the end of Level 1 leading questions that will jump start this process. For example, after a student has learned the piece below, you might ask the following questions:
- How many Bass C’s can you find in this piece? (4)
- What is the highest note in this piece? (G)
- What note comes right after C? (D)
These types of questions can be asked quite easily in the lesson and they only take a minute or two, but they help the student make the connection that each note on the piano has a specific location on the staff.

Piano Safari Level 2
A Short Overview
In Piano Safari Level 2, students play pieces and sight reading cards that are composed with different textures. By this, we mean that they are not simply reading hands separately as they did in Level 1, but now are required to read parallel motion, simple counterpoint, melody and accompaniment, and dovetailing melodies (when a melody passes back and forth between the hands).
Following is how the intervallic approach develops throughout Level 2:
- Unit 1: Students review repeated notes, 2nds and 3rds. In addition to Treble G and Bass C, Middle C is introduced as a landmark note.
- Unit 2: Students learn a new system for learning to identify the notes on the grand staff. Pieces may now begin off the landmark notes.
- Unit 3: The interval of a 5th is introduced. Students play reading pieces with only repeated notes, 3rds, and 5ths, as these intervals move between two lines or two spaces. Accidentals are presented.
- Unit 4: Students play reading pieces with 2nds, 3rds, and 5ths.
- Unit 5: The interval of a 4th is introduced and compared with 2nds, as they both move from a line to space or space to line.
- Unit 6: Students play pieces using intervals 2nds-5ths, starting on any note on the grand staff.
Summary
There are many factors that contribute to the development of strong reading skills such as notational audiation, pattern recognition, understanding melodic contour and intervals, and individual note recognition. One of the most important factors, however, is consistency, time, and persistence.


